Creating online teaching resources
This is one of three topics in Theme 2: Teaching with data online of the 2020 virtual symposium.
Creating pre-recorded (asynchronous) recordings will be one of the activities which will keep many of busy over the summer. This will be how we convey much of our material (other than asking students to read or listen to other sources). On this page you can find a range of possible ways in which you can create such material. We also discuss ideas of how to combine these into learning packages.
Lock at the material and consider how you will be producing pre-recorded material.
Go to the Discussion Board on Piazza - (Access Code: C19 in case you log in for the first time) and let us know which issues you are facing when it comes to producing such material.
A low tech home visualiser
Guglielmo Volpe, City University of London
Teaching quantitative subjects often involves the handwriting of formulae either on the big screen or on the whiteboard to help students understand how results are derived. This video shows that replicating the process of handwriting formulae while teaching online does not require ‘high-tech’ solutions such as tablets, stylus or doc-cams. Your mobile phone, pen and paper can do the trick! The picture below shows my set up when recording the video:
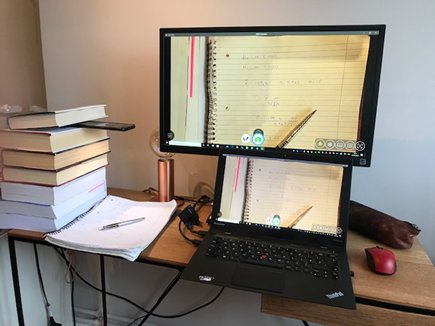
I downloaded an app called IPEVO iDocCam on my mobile phone and on my laptop. The software allows to cast live pictures from my phone to my laptop via wifi. So, as you can see from the picture, I positioned my phone on top of a pile of books and any writing on the notebook was displayed on my laptop (alternatively, you can use any phone holder). I then used Zoom to share my screen with an audience that, in turn, could watch my writing. I used Zoom to record the video as well.
In general, the experience has been positive but not without glitches. The software costs about £19 (permanent purchase), £0.99 per month or £9.99 per year and is available for free for a period of one month. While the software was easy and intuitive to use, it was not always ‘stable’ and it would often revert to ‘standard’ settings after I modified them to adjust them to my needs. The interface with Zoom was also not always effortless. This could, however, be due to my hardware which is not the most recent one or the stability of the wifi signal.
Overall, I think it is an interesting solutions and I would recommend you try it if you are planning to do some handwriting in your own teaching and you are looking for an easy-to-implement and cheap technology.
OneNote plus annotations
Ralf Becker, University of Manchester
This six minute video discusses using screen-capture software, Microsoft OneNote, and a tablet input device (or tablet computer) to turn a set of lecture slides into a video with narration and annotation.
Watch with transcript and time stamps
Producing Teaching Material in Powerpoint
Edmund Cannon, University of Bristol
Powerpoint can include equations and other mathematical content, can include videos, and can record presentations with audio and video narration. This 21 minute video shows how to use these features to create videos for teaching.
Watch with transcript and time stamps.
Synchronous and asynchronous problem based sessions
Steven Proud, University of Bristol
For both synchronous, and asynchronous sessions, where I need to discuss mathematical problems, I use a combination of an iPad, Apple Pencil, Explain Everything, and a computer. Explain Everything acts as an (infinite) whiteboard, allowing you to zoom in, zoom out, and relocate material as you like within the screen.
For synchronous sessions, provided you are on the same wireless network, Zoom allows you to share the screen of your iPad with students. The set-up I use is shown below, mid-session.
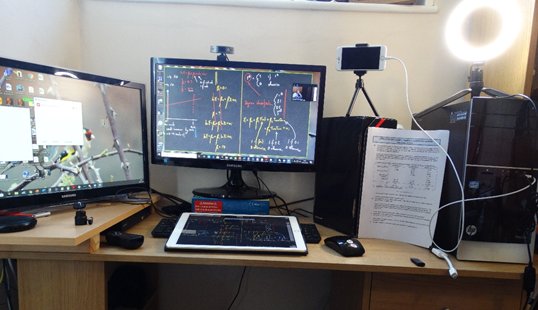
As the webcam I have is very low resolution, I use an app for the iPhone called IVCam, which allows an iPhone, iPad or Android device to be used as a webcam, and provides much higher resolution images.
In asynchronous sessions, I combine material from Explain Everything, a video of me narrating the material, and often a third element (such as an image, detailing the problem that students have been asked).
Embedding Asynchronous Lectures into Platforms
Steven Proud, University of Bristol
One of the challenges of teaching online is that students may lose focus quite quickly, particularly if you try to directly convert a 2 hour lecture into an online experience.
We can use many of the tricks that we already use in live, Face-to-Face lectures to engage students, and to ensure that they are learning actively by breaking up videos into manageable chunks, and to intersperse videos with exercises.
You can create these sorts of structure through Online Learning Environments, (such as Blackboard, or Moodle), but it can take quite a lot of work to design a student learning journey that is easy for students to both navigate, remember which elements that they have engaged with, and to provide feedback to you as an instructor.
There are a range of packages available to create online learning journeys; these include Xerte, Articulate Storyline, and others. I have used Xerte in the example below, and this produces a functional learning journey for students. (You may need to expand the window to gain the full experience). In addition, Alvin Birdi has produced some resources using Articulate Storyline.
Example of material produced in Xerte
Some ad-blocking software may result in a blank space rather than embedded tutorial, so here's a direct link.
Example of material produced in Articulate Storyline
http://core.abeconomics.org/core-unit3/content/#/
Next topic: Use of statistical and econometric software
↑ Top